Four Winds
Express
Damage Control

We
purchased a 2004, 26-foot, Four Winds Express in April of 2010. We camped in Ocala, Florida, various locations in Georgia, Louisville, Kentucky, Avon, Ohio, and at least one other roadside campground off of I-75 in Kentucky.
The
first Winter we decided to pull out all of the carpeting and existing linoleum
and replace it with vinyl tile squares.
The carpet is just a dirt magnet and tile squares are easier to replace
if damaged.
While
pulling/cutting out the carpet and linoleum I discovered a soft area of wood on
the main floor near the slide out. I
followed the soft wood to the wall, up that wall and to the main beam, which
spans the opening of the slide out.
Further investigation would lead to finding rotted wood along the main
floor beam under the slide-out opening, and more along the outside bottom edge
nearly all the way around the camper.
Subsequently, we did replace water damaged/rotted wood in the front right
quadrant, under the front sheet metal.
Special Shout Out to Wynn Watson, who advised and worked on the removal, and replacement of all of this rotten wood. Under his tutelage, I learned all about the details of removing structural wood without damaging the surrounding sheet metal or non-damaged wood. He is quite humorous on top of all of that knowledge as well.
After
the major repair was completed, back in the winter of 2010-2011, we went
camping in Georgia and happened to meet two men who had previously worked in
camper manufacturing. One of them
bragged that it was common to build a camper like the Four Winds in about
45-minutes from start to finish. It is
no wonder that quality control is lacking and in fact it is because of that
speedy process that these campers are made to fall apart.
As
described by one of those men, and witnessed in the actual construction while
tearing it apart, a layer of plywood is laid on the steel-beamed trailer frame,
and then covered completely with linoleum.
That alone traps any moisture between the linoleum and non-treated
plywood, and allows wood rot to start.
Furthermore,
once the frame is on, a product called Luan plywood, with a plasticized wall
paper overall is stapled to the wall studs.
This process again assures that any water getting behind the wall paper
will stay there. By simply avoiding the
previous two processes, much of the wood rot could be avoided. Using pressure-treated wood for the main
beams, if allowed by code, would be another technique to aid in longer life of
the trailer.
The
following pages will illustrate one way to repair and mitigate further water
intrusion. In this project, only
pressure-treated lumber/plywood was utilized, and a coating of Kilz (primer) or
polyurethane paint, or both were used to seal the wood from further water
intrusion. Also, all remaining linoleum
was subsequently removed, and three coats of polyurethane paint was used on all
floor surfaces to seal the wood and allow for better sticking of the square
tiles.
As with any of these in-depth projects, make sure you take plenty of pictures for reference, detail analysis and to aid in putting everything back where it belongs. A roll of tape is handy for putting labels on wires, or marking pieces of wood for later reference.
Of course we always assume that a person undertaking this type of work will adhere to common safety practice, such as wearing earplugs, safety glasses, gloves, knee-pads, and enclosed shoes. Cleaning your work space will make for a safer day, and will help you organize the next steps.

The drawing above represents the basic layout of the FourWinds Express. I will refer to four quadrants, Left Front, Left Aft, Right Front, and Right Aft.
We will start in the Left Front, where the rot was initially found.
The picture below shows the area where the left front side of the slide out joins the left front quadrant of the trailer.

In order to gain full access to the initial damage area, we had to remove the closet, carpet, and vinyl floor covering.
There is rot on the slide out, the lower and upper main support beams and the wall stud at the point where the slide out opening is located.
Note the lower main support beam is made up of three separate boards. In RV construction the wall studs are smaller than the standard 2 x 4. We had to cut down 2 x 4's, 2 x 6's and special order the plywood used in the floorboard.
Just
forward of the slide out, the rotted wood continues. This picture shows the plain, steel, carriage
bolt used to hold the main beam to the metal frame below. Most carriage bolts were rusted almost, if
not all the way through.

The picture below shows the forward end of the upper main beam.

The picture below depicts the extent of the damage to the upper main support beam. It is amazing that it did not fail during our previous camping trips. It is highly likely that this damage began many months before we ever bought the camper. I good pre-buy inspection by a knowledgeable inspector would have uncovered the damage.

Removing the upper main support beam was a difficult job. Once successful, we placed it on the ground to photograph it. See below.

In the picture above, you will see that there are actually three components to the upper main support beam. There's a 2 x 3 (the picture note indicates 2 x 4 but nothing in the RV industry is that large) on top, then a board roughly 2 x 6, then plywood on the bottom.
The picture below shows the aft end of the beam still installed.


The picture below shows the aft end of the beam still installed.

This shows the main beam
removed, with just a layer of sheet metal left in place. Removing the wood means first removing and/or
cutting all of the nails and staples.
There were many, many staples used in the manufacturing of this trailer. Our success in removing the roof support
beams, wall studs and floor boards came by carefully using diagonal cutters
(wire cutting pliers), reciprocating saws, and small chisels on the nails and
staples, then pry bars of successively larger sizes to make gaps and then
slowly spreading those gaps until the boards were separated. If you are in a hurry during this process, you'll probably cause more damage, so take your time.

Now let's look at the repairs
we made to those areas.
This is what the original
soft spot looks like after repairs.

Here's the same area after we painted it.

We then installed the insulation, and new floor board.

... then we put the closet back in.

The aft upper and lower require just as much repair. See the succession of pictures below.


In the picture below, we've installed the scuff plate, a plastic piece which allows the slide out to slide into the camper, without damaging the floor.

The upper beam required as much attention.

The slide out, which had been removed and was sitting on supports, also needed repair. See the below pictures of damage and subsequent repair. You'll notice we used angle brackets, and sheet metal to add strength to corner areas.


Let's continue around the perimeter of the trailer, and we will look at the damage near the main entrance in the right rear corner.
In this picture we've already removed some of the rotten wood and are preparing to remove the rest.

In this one, we've replaced some of the wood.

Then we replaced more of the wood.

As I mentioned the workmanship in this trailer is poor. Evidence of this is seen in the picture below, where the license plate mounting screws totally miss any wood.

Here we added wood with bracing sheet metal.

Moving towards the Right Front quadrant, there was damage near the bedroom door/entrance.

Note the water pipe has curved all the way across the front of the trailer, under the area where the bed is located, then into the bathroom area.
Here's the same area with repairs made.

Here's the same area with repairs made.

Now, on to the very front of the camper. In the Right Front quadrant, there was damage to the main spar. In the next group of pictures, you will notice the before pictures for reference, then some sequence of removing Luan paneling, and underlying support wood, and some of the subsequent repairs.


If you look carefully at the image below, you'll see one small spot that looks out of place. This is the original indication there was damage in this area.


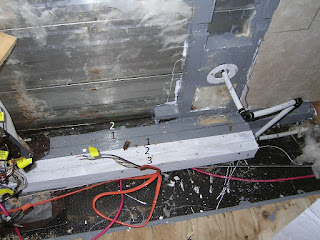
In the photo below, you'll notice that I've numbered the boards where they join other boards. This is because I can cut them out and reuse them in the same spot for rebuild. Note also that the manufacturer used a support board with a large knot, and then drilled a whole in the same area.

In this image, you'll see the upper part of the spar. You'll see in subsequent photos that the spar appears to be one big piece of knotted wood.


Finally, we removed the spar and I have it in hand to show the damage.

Here's the area where the spar was previously.

Here's the new spar in place and painted.

Here's the next spar over. It was not damaged so I painted it to help prevent rot in the future.

This image shows some of the support wood painted with some Luan replaced.


The following are some pictures of the finished product. Thanks again to Wynn Watson, who installed every tile and custom cut them to fit every nook and cranny.


